A Comprehensive Guide to Concrete Driveway Repair
Fix concrete driveway damage fast with this complete concrete driveway repair guide covering cracks, leveling, and resurfacing.
A Comprehensive Guide to Concrete Driveway Repair
Why Concrete Driveway Repair Matters More Than You Think
Concrete driveway repair is one of those home maintenance tasks that's easy to put off — until a small crack turns into a sinking slab or a crumbling mess that costs far more to fix.
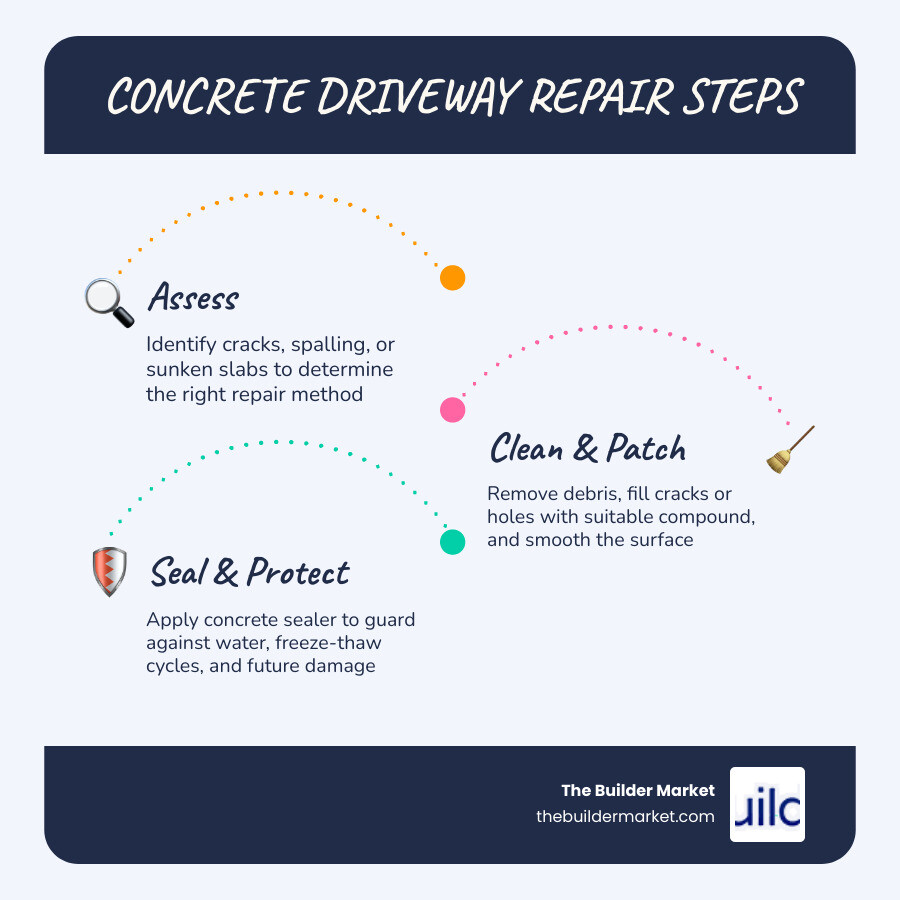
Here's a quick overview of how to repair a concrete driveway:
- Assess the damage - Identify whether you're dealing with hairline cracks, spalling, potholes, or sunken slabs
- Clean the area - Remove loose debris with a wire brush and pressure wash the surface
- Choose the right repair method - Use crack filler for small cracks, patching compound for potholes, and consider professional leveling for sunken sections
- Apply the repair material - Fill cracks or holes, trowel smooth, and allow proper curing time (24–48 hours minimum)
- Seal the surface - Apply a concrete sealer to protect against water, freeze-thaw cycles, and future damage
- Know when to call a pro - Deep structural cracks, widespread spalling, or sinking slabs often need professional attention
The good news? Most concrete driveways can be repaired rather than replaced — and catching problems early makes the job much simpler and more affordable.
As one homeowner put it after a rough winter left their driveway crumbling in multiple spots: the damage looked overwhelming at first, but a systematic approach — cleaning, patching, and sealing — brought it back to life without a full replacement.
All concrete driveways crack eventually. Freeze-thaw cycles, heavy vehicle loads, tree roots, and poor drainage all take their toll over time. The key is knowing what type of damage you're dealing with, what you can fix yourself, and when it's time to bring in a professional.
This guide walks you through everything — from simple DIY crack repairs to professional concrete leveling — so you can make the right call for your driveway.
Concrete driveway repair terms explained:
- foundation repair estimate
- stucco repair estimate
- irrigation system repair
Common Types of Driveway Damage and Their Causes
Before we roll up our sleeves and dive into the repair process, we need to understand what we are dealing with. Concrete is incredibly strong under compression, but it is surprisingly rigid and vulnerable to tensile stresses, moisture, and shifting soil.
When we inspect a driveway, we typically categorize the damage into a few distinct types:
- Hairline and Surface Cracks: These are minor cracks, often less than a quarter-inch wide. They are usually cosmetic but can quickly turn into major issues if water gets inside and freezes.
- Deep Structural Cracks: Cracks wider than a quarter-inch that run deep through the slab. These often point to subgrade movement or heavy load stress.
- Spalling and Scaling: This is when the top layer of the concrete peels, flakes, or crumbles away, exposing the rough aggregate underneath.
- Sinking and Settling Slabs: This occurs when entire sections of the driveway drop, creating uneven transitions, tripping hazards, and pooling water.
Understanding the root cause of these issues is the first step toward a permanent fix. If you patch a crack without addressing why it formed, you will find yourself doing the exact same repair next season.
Understanding Spalling and Scaling
Spalling and scaling are particularly common in regions that experience harsh winter weather. When water penetrates the porous surface of the concrete and freezes, it expands. This internal pressure eventually pops off the top layer of the concrete, leaving an unsightly, pitted surface.
This process is accelerated by the use of chemical deicing salts, which lower the freezing point of water and increase the frequency of freeze-thaw cycles. Additionally, spalling can occur if the concrete was poorly mixed or finished when first poured — specifically, if too much water was added to the mix, which weakens the top surface layer.
To restore a spalled surface, we must clean away all the loose material and apply specialized toppings. For homeowners in the Atlanta area dealing with winter-related surface damage, consulting local experts like Concrete Driveway Repair can help ensure the right bonding agents are used to prevent the new layer from flaking off.
Why Concrete Slabs Sink and Settle
If you notice that one side of your driveway slab is sitting lower than the other, or if there is a noticeable drop in front of your garage door, you are dealing with slab settlement. This is rarely a failure of the concrete itself; instead, it is a failure of the soil beneath it.
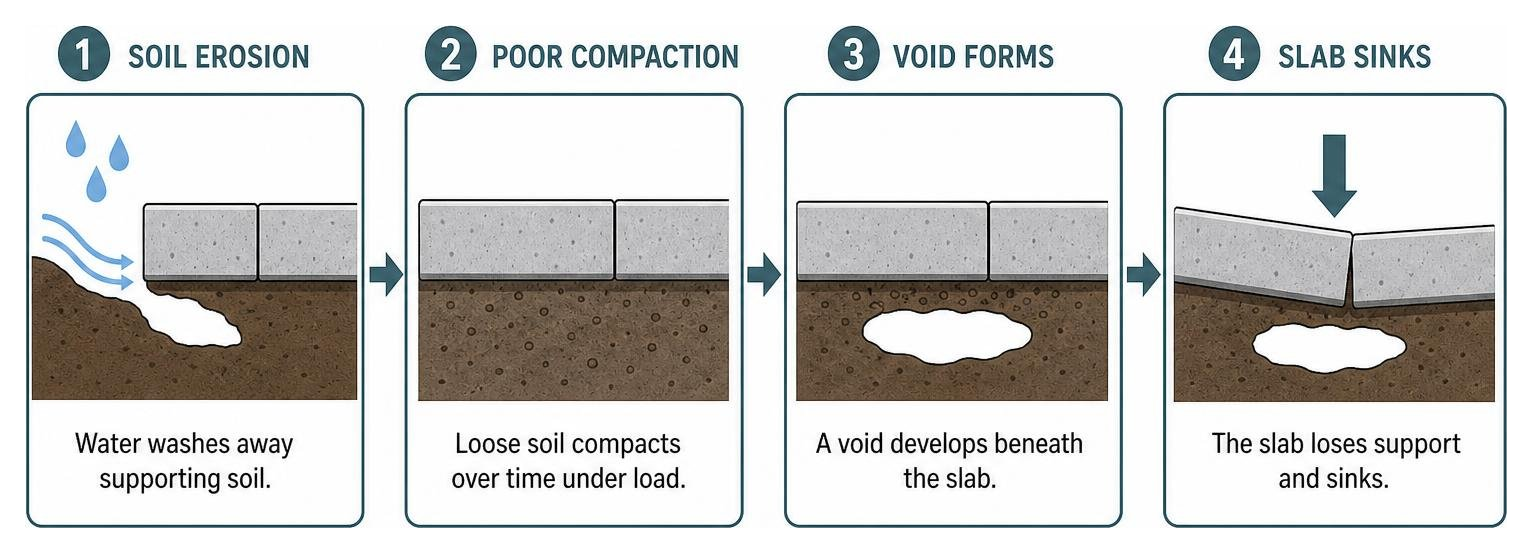
There are three primary reasons why the subgrade fails:
- Soil Erosion: Poor drainage, broken gutters, or heavy downpours can wash away the supporting soil beneath the slab, leaving a hollow void.
- Improper Compaction: When the driveway was originally poured, the soil base may not have been compacted thoroughly. Over time, the heavy weight of vehicles causes the loose soil — and the slab above it — to settle.
- Tree Roots: Nearby trees can grow massive roots beneath the concrete, lifting slabs up as they grow, or creating voids underneath when the roots eventually decay.
For structural issues like these, surface patching is only a temporary band-aid. Homeowners in places like Alpharetta can reach out to Concrete Driveway Repair to assess whether the subgrade needs correction or if the slab requires professional lifting to prevent further structural cracking.
Step-by-Step DIY Concrete Driveway Repair Guide
For minor cosmetic issues, small cracks, and shallow potholes, a DIY repair is a highly rewarding weekend project. The key to a repair that lasts years rather than months lies entirely in the preparation. Concrete does not easily stick to old, dirty concrete, so we must make the environment as welcoming as possible for our patching materials.
To get started, we must prepare the surface. If you are repairing a crack, use a hammer and chisel to "undercut" the edges of the crack. This means making the bottom of the crack slightly wider than the top, creating a mechanical keyway that locks the patching compound in place.
Once the crack is prepped, thoroughly clean it. Scrub the area with a stiff wire brush to remove algae, dirt, and loose concrete chunks. Vacuum out the remaining dust with a shop-vac, and then pressure wash the entire area. Allow the driveway to dry completely before applying any sealants or fillers, as moisture can ruin the adhesion.
If you are working on a larger patch, applying a liquid concrete bonding adhesive to the old concrete surface before pouring your patch mix is highly recommended. For those in the Charlotte area looking for professional guidance or materials, Concrete Driveway Repair can assist with evaluating more complex surface prep needs.
Essential Tools for Concrete Driveway Repair
Before starting, make sure you have the following tools and materials on hand:
- Cleaning Equipment: Stiff-bristle wire brush, push broom, shop vacuum, and a high-powered pressure washer.
- Safety Gear: Heavy-duty rubber gloves, safety glasses, dust mask (essential when mixing dry concrete), and kneepads.
- Application Tools: Caulking gun (for tube-based crack fillers), margin trowel, steel finishing trowel, and a squeegee (if resurfacing).
- Repair Materials:
- Flexible concrete crack sealant (polyurethane-based is best as it moves with freeze-thaw cycles).
- Foam backer rod (for deep cracks wider than a quarter-inch).
- Polymer-modified concrete patch mix (which can be mixed to a thick, peanut-butter consistency).
- Concrete bonding adhesive.
How to Patch Minor Cracks and Potholes
Once your driveway is clean and dry, follow these steps to patch minor cracks and small potholes:
- Insert Backer Rod (for deep cracks): If a crack is deeper than a half-inch, push a foam backer rod into the crack using a screwdriver. The rod should sit about a quarter-inch below the concrete surface. This prevents you from wasting expensive sealant and allows the sealant to expand and contract properly.
- Apply Crack Filler: Load your flexible polyurethane sealant into a caulking gun. Insert the nozzle into the crack and pull a steady bead of sealant, filling the crack flush with the surface. Smooth it out with a gloved finger or a putty knife tool.
- Mix and Apply Patching Compound: For potholes or deep gouges, mix your concrete patch compound with water until it reaches a thick, peanut-butter consistency.
- Trowel to Finish: Pack the mixture tightly into the hole using a trowel, starting from the bottom and working your way up. Overfill the hole slightly, then use the flat edge of your steel trowel to scrape the surface flush with the surrounding driveway.
- Texture the Surface: To prevent a slippery spot, gently drag a stiff-bristle broom across the wet patch to match the brushed texture of the rest of your driveway.
For homeowners in South Florida looking to tackle these repairs, Concrete Driveway Repair provides excellent local insights on selecting materials that stand up to heat and high humidity.
Professional Concrete Leveling vs. DIY Patching
While patching minor cracks is a great DIY task, attempting to level a sunken concrete slab yourself is highly discouraged. Slabs weigh thousands of pounds, and trying to pry them up or fill under them with quick-set concrete usually results in cracked, ruined slabs.
This is where professional concrete leveling comes in. There are two primary professional methods:
- Mudjacking: An older method where a slurry of soil, sand, cement, and water is pumped under the slab through large drilled holes to hydraulically lift it back into place.
- Polyurethane Foam Injection (such as PolyLevel): A modern, highly effective method. Technicians drill tiny, penny-sized holes in the concrete and inject a high-density expanding polymer foam underneath. The foam expands rapidly, filling voids, compacting the soil, and gently lifting the slab back to its original position.
The benefits of polyurethane foam are substantial. It is incredibly lightweight (meaning it won't add heavy weight to already unstable soil), waterproof, and cures in about fifteen minutes, allowing you to use your driveway the very same day.
For homeowners in areas like Southfield, Michigan, consulting with a professional service like Concrete Driveway Repair can help you determine if your uneven slab is a candidate for polyurethane lifting, saving you the immense effort of tearing out the concrete.
When to Hire a Professional for Concrete Driveway Repair
How do you know when a project has crossed the line from "weekend DIY" to "call in the pros"? Look for these indicators:
- Widespread Structural Damage: If your driveway has deep, jagged cracks running in multiple directions, or if sections are crumbling completely.
- Significant Settlement: Any slab that has sunk more than an inch, creating a major trip hazard or causing water to pool against your home's foundation.
- Tree Root Intrusions: If a massive tree root has lifted a slab, the concrete must be carefully cut, the root managed (often with the help of an arborist), and the subgrade rebuilt before pouring a new section.
- Complex Subgrade and Drainage Issues: If your driveway is sinking because of a subterranean stream or severe erosion, the drainage must be professionally corrected first.
Professionals don't just patch the surface; they perform structural repairs. This includes cutting clean boundaries around the damaged area, correcting subgrade issues, drilling and installing epoxy-set steel dowel bars to tie the new concrete to the old, and using heavy-duty commercial-grade concrete mixes.
If you are dealing with complex structural issues in the Richmond area, reaching out to Concrete Driveway Repair is the best way to diagnose the root cause of the damage and ensure a repair that lasts decades.
Pros and Cons of Resurfacing vs. Full Replacement
When a driveway is covered in fine cracks (crazing) or widespread surface scaling, but is otherwise structurally sound and level, you face a major decision: should you resurface it, or is it time for a full replacement?
Here is a quick comparison to help you weigh your options:
| Feature | Concrete Resurfacing | Full Driveway Replacement |
|---|---|---|
| Primary Purpose | Restores cosmetic appearance and minor surface wear | Resolves deep structural failure and subgrade issues |
| Thickness | Thin overlay (typically 1/8" to 1/4" thick) | Full slab thickness (typically 4" to 6") |
| Lifespan | 8 to 15 years with proper maintenance | 30 to 50 years with proper maintenance |
| Process Complexity | High-pressure wash, patch, apply thin resurfacer | Demolition, excavation, subgrade compaction, pouring |
| Cure Time | Usable for foot traffic in 24 hours | Requires up to 7-28 days to fully cure for vehicles |
The Benefits of Concrete Resurfacing
Concrete resurfacing is an outstanding option when your driveway is structurally sound but looks old, stained, or tired. Instead of tearing out the entire slab, a professional applies a polymer-modified concrete resurfacer over the existing concrete.
This thin overlay fills in minor imperfections, covers up old patches, and cures to a uniform, light-gray finish that looks brand new. You can even choose to add decorative elements like stamping, staining, or engraving during the resurfacing process to give your home a high-end look.
For homeowners in Denver looking to revive their home's curb appeal, Concrete Driveway Repair can help apply a premium, wear-resistant overlay that completely transforms the look of your property.
When Full Replacement is Necessary
As much as we love the simplicity of resurfacing, it cannot save a structurally failed driveway. If your concrete is crumbling into gravel, has deep structural cracks wider than an inch, or has settled severely in multiple areas due to a collapsing subgrade, resurfacing is a waste of resources. The underlying cracks will simply "reflect" up through the new thin overlay within a season or two.
A full replacement involves demolishing and hauling away the old concrete, excavating the area, correcting the subgrade, compacting a sturdy gravel base, laying a steel rebar reinforcement grid, and pouring a fresh slab of commercial-grade concrete.
If your driveway is past the point of saving, homeowners in Chicago can connect with Concrete Driveway Repair to handle the heavy lifting, demolition, and precise pouring required for a durable new driveway.
Frequently Asked Questions about Driveway Maintenance
How often should I seal my concrete driveway?
To keep your concrete driveway in peak condition, we recommend applying a high-quality concrete sealer every two to three years. Sealers create a hydrophobic barrier that prevents water, oil, and deicing chemicals from penetrating the porous concrete.
Apply the sealer on a dry day when temperatures are moderate. If you are in the Norfolk area and want to ensure your driveway is fully protected against coastal humidity and winter freezes, Concrete Driveway Repair can help apply a premium, breathable penetrating sealer.
Can I use asphalt to patch a concrete driveway?
While it might be tempting to grab a bag of cold-patch asphalt from the local hardware store to fill a pothole in your concrete, we strongly advise against it. Asphalt and concrete are chemically different materials with completely different rates of thermal expansion.
An asphalt patch in a concrete driveway will not bond properly, will look like an unsightly black smudge on your light-gray concrete, and will quickly crumble out after the first freeze-thaw cycle. Always use concrete-compatible, polymer-modified patching compounds. For homeowners in Sheridan looking for compatible concrete repair compounds, Concrete Driveway Repair can provide the right materials and expertise.
How long does a concrete driveway repair last?
The lifespan of a concrete repair depends entirely on the quality of the preparation and the materials used. A simple DIY crack sealing using flexible polyurethane can last five to ten years if the crack was thoroughly cleaned and dried beforehand.
A professional concrete resurfacing overlay typically lasts eight to fifteen years, while professional concrete leveling can last as long as the concrete slab itself, provided the underlying drainage issues are resolved. To get the maximum lifespan out of your repairs in the Jackson area, partnering with Concrete Driveway Repair ensures that commercial-grade materials are applied with expert precision.
Conclusion
Taking care of your concrete driveway doesn't just improve your home's curb appeal; it protects one of the most heavily used structural components of your property. Whether you decide to tackle minor hairline cracks yourself this weekend or bring in a professional team to lift a sunken slab, addressing damage early is always the smartest, most cost-effective move.
When you need professional help to restore your driveway, you don't have to guess who to trust. At The Builder Market, we make finding the right local contractor simple and stress-free. As an AI-powered online marketplace, we connect homeowners directly with vetted, highly qualified professionals in your exact area.
From quick concrete leveling and resurfacing to complete driveway overhauls and addition remodeling services, our platform matches you with the perfect pro for your project. Ready to restore your driveway to its former glory? Let us help you find a trusted concrete professional in your neighborhood today.
Need Help?
Contact us today to discuss your needs. Our team is ready to help.
About the Author
The Builder Market
More Articles
View All PostsRelated Articles
Ready to grow with The Builder Market?
Explore listings, AI growth, sites, and lead options—or talk to our team about what fits your business.

